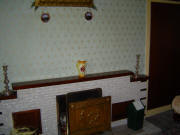
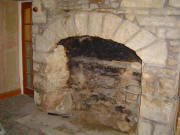
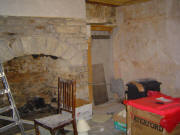
The PlanThe main driver behind getting this project underway was the need to get a wood-burning stove installed before the winter kicked in properly. Despite our ownership of a Jensen Interceptor, we aspire towards environmental responsibility and as such, we wanted to reduce our dependence on oil-fired central heating as much as was possible. The main alternatives were a wood-burner and geothermal heating. While the latter would have been nice, we decided that this would be a longer-term objective and that we would be better off installing a wood-burner. The basic plan was to get the fireplace out, put down some semi-solid flooring, strip the wooden ceiling, strip the wallpaper, paint it and put the new stove in, along with some shelving. We had five people available to work on it, so we figured we could get everything liveable if not complete in a week. Assistance had been volunteered by Jo's Mum, her friend Helen and my brother Paul. Getting StartedThe first job was to get the room cleared which we accomplished without too much ado. However, here we hit our first snag. It turned out that the floor didn't look particularly well damp-proofed as there were damp spots on the floor. This left us with the choice between installing flooring compatible with the slight level of damp or ripping out and damp-proofing the concrete floor. We decided on the former, and changed our planned flooring material to slate tiles. Next, we set to work on the fireplace while diverting some of our resources towards stripping the ceiling. The original plan was to sand down the ceiling but this turned out to be a non-runner due to the number of coats applied over the year. So, a heat gun was acquired and this proved a slow but steady first step in the stripping. The stripping technique basically involved removing the bulk of the material with the heat gun, stripping back the remainder with a wire brush in a hand-drill and cleaning it all off with a sander. This required me to spend most of a week on a step-ladder with my hands over my head. The FireplaceThe fireplace was turning out a bit better. There was an old back-boiler in place which we were having some difficulty with extracting due to the amount of rubble surrounding it. We worked upwards until we hit what appeared to be a keystone. At this stage, it was beginning to get exciting so it was all hands on deck into the fireplace. In about an hour of scrambling we uncovered the shape of a stone arch but it ended up taking us a couple of days to get the fireplace completely revealed. But when we did this, it was pretty amazing what we had uncovered. Even the original anchor point for the crane had been buried. The bad point was that we discovered that the chimney was unlined but this was a problem for another day. Once everything was cleared out, we had to make a slab to raise the level of the hearth a few inches off the floor. This was relatively easily accomplished with hand-mixed concrete and dried out nicely in a couple of days. The next step was to line the chimney and install the stove. We went for the easy option of flexi-liner so we had to get plates made up for both top and bottom of the chimney. We put the stove in place and put in the enamelled solid flue connecting the stove with chimney. Then we dropped the flexi-liner from the top, put the bottom plate loosely in place and connected the flue with liner using a jubilee clip. The next step was then to fire-cement in the bottom plate and go up on the roof and drop a couple of bags of vermiculite down the chimney to give a bit of insulation. I reckon we put in enough to fill about a metre of the chimney which should do nicely. Then we had to cap off the chimney by installing the top plate and concreting it in. Then all we had to do was wait for the plumber. The FloorThe floor was simple enough as it was just to be tiled with slate quarry tiles. This was a bit time consuming but wasn't a particularly arduous chore. The main snag here was that the motor burnt out on my tile cutter so that needed to be replaced. PlasteringWhen we took off the wallpaper, we discovered that some of the walls hadn't been plastered and others had seriously degraded. We got a plasterer in to do the skimming on the dry-lining and Jo decided to attack the interior wall and put a brushed effect on it. Before getting the plasterer in, I put some lining on the window area and tidied up an alcove where there used to be a window. This all turned out very well. CarpentryThe carpentry consisted mainly of enclosing the piping for the central heating which was running up through a natty cupboard before we ripped out the cupboard. We decided to panel this to match the ceiling and put some shelves into the resulting alcove. The panelling consisted of making a framework onto which I could attach the panelling. To make everything a bit sturdier, I put MDF onto the framework, and pinned the panelling onto this. We also left back of the alcove just painted MDF as we felt that it could end up a bit too woody. |
|